Since installing Windows 10 the option to enter BIOS settings disappeared on my HP Pavillion DV8, with the only way to get it back was to pull the CMOS battery from the laptop and perform a hard reset.
If you’re having the same trouble the solution is easy, instead of clicking shut down to turn off the laptop and switch it on again, click restart instead! Seems simple but I always used shut down to allow the machine to cool off before turning on again.
My trusty HP Microserver N36L has been ticking along nicely for years with Windows 2003 at the helm, but with support for 2003 coming to an end an alternative was needed.
Recently I have been using Amazon EC2 cloud services for all my website hosting, new customers to the service get a 12 months free teir1.micro instance with myself opting for Windows Server 2012 R2 as my OS, and I’ve taken up this offer since October last year when an extended spell of server woes left me unable to serve websites.
A caveat with the free EC2 instance is the billing process, while the instance is free you have to pay attention to what is included as part of the offer, network usage, hard drive capacities and security keys are subject to charge over certain thresholds, so be aware.
With the trail due to expire in a few months I preferred to avoid an ongoing monthly cost and bring website hosting back to my own server, but not my current server as I didn’t want a box that served the web as well as store all my personal files. The logical conclusion was to get a new server.
It had to happen, after years of reliability (apart from an ISP related failure), I had my first hardware related downtime, caused by a power cut that lasted all of one second.
In the electric free event, only a few electricals switched off, my HP Microserver was one that lost power and restarted. Looking at the headless unit after boot, all lights were on, HDD light on full and the network lamp was flickering away as normal. However trying to access the server, even down to a simple ping, it was unresponsive.
Time for investigation, and it was ripped out of its kitchen cupboard home and connected to a TV along with a keyboard and mouse. From there it was painfully apparent that the RAID mirror had been corrupted and the BIOS couldn’t find the OS. The OS drive was in a RAID 1 mirror so I took out the primary master disk (first on the BIOS boot priority) and tried to boot the remaining mirror. This time it started Windows. All was back on track it seemed, waited for the other mirror holding data to re-sync then changed the boot priority in Windows (not BIOS) to use the good OS drive first. A restart to plug the un-synced HDD in and it booted fine, no SMART errors reported with the removed drive and it started to rebuild the system mirror.
Things then took an ugly turn, using the desktop would be as normal for around 90 seconds, then the system would freeze, apart from the mouse for minutes at a time, before coming back to life and displayed applications requested before the freeze. It seemed as if the system was having big problems trying to read from the disk, it would run fine simply moving the mouse around, but when selecting a program it would freeze, and depending on what you requested to load it could be up to 20 minutes. While in this state of freeze, the HDD lamp on the Microserver would be solid, so naturally it pointed to either a bad hard drive or the RAID mirror was having problems.
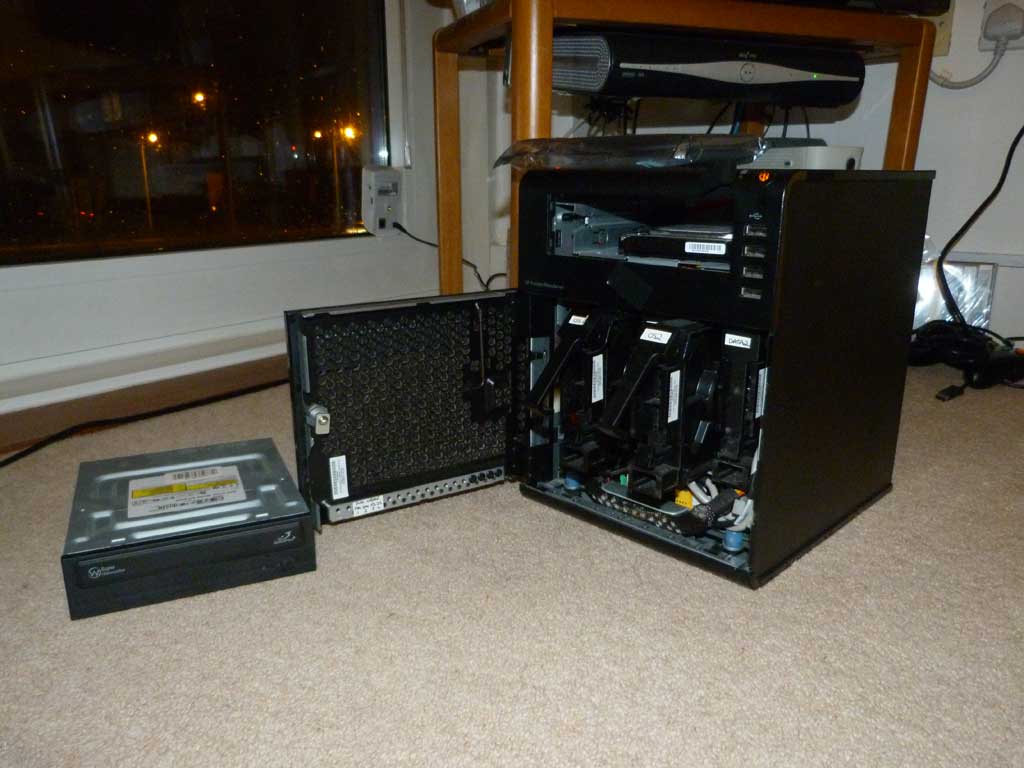
The HP Microserver in a state of repair
Not finding a solution, I admitted defeat and did a fresh install of windows, but still wanted to get the latest backup, the data mirror was easy to recover by just removing the drives as they can be imported on a new install. The OS drive was a bit trickier, the system would freeze if I tried to copy files as is. Luckily I had the old 250GB drive that came with the Microserver, it had Windows 2003 on it and ran on the system until more capacity was required, it was swapped out for a 1TB drive. Not so lucky was that the only software found to copy files from a Foreign RAID mirror cost £50, I shelled out this money as my data was more valuable than the asking fee. Along with an extra 1TB drive to hold the data while I juggle drives it ended up costing me a few quid.
All this from a 1 second power cut.
RAID 1 on a system disk:
Research says this is not a good idea. While it will run with no issues during normal operation, after an unexpected shutdown a RAID controller just can’t tell the difference between a good file and an un-synced, corrupt file, so the controller will either guess, which could restore an out of data file, or create a mismatch of current and out of date files that ultimately brings your OS to a halt.
Connecting a printer to a server compared to a desktop system is not as straight forward as it may be perceived. Whether the manufacturers software simply refuses to install on Windows 2003 or insists on adding a load of bloatware on your system, here is how to get around it:
Step 1: Start by downloading the basic version of the drivers from the HP website, choose Windows XP drivers if there are none for Windows 2003
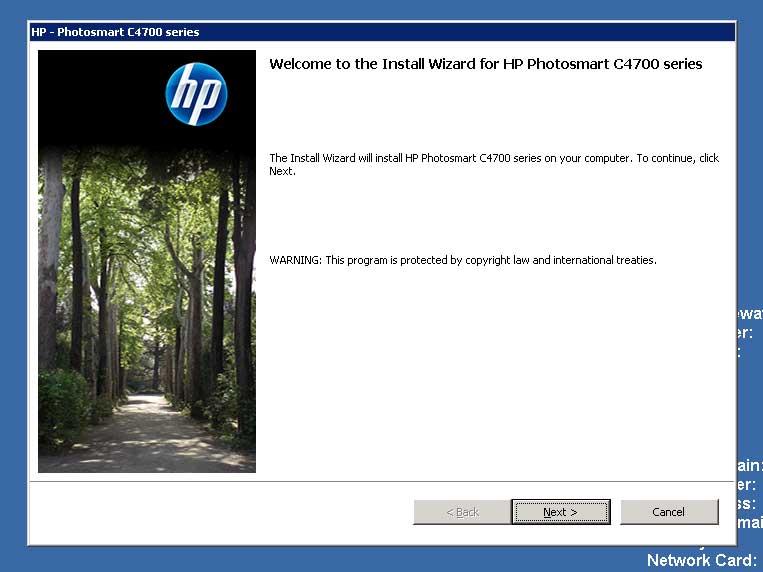
Step 2: Open the executable file, allow it to extract and display the first setup screen. Here, depending on the printer chosen it may let you continue with the setup, or stop the installation there telling you the operating system is not supported.
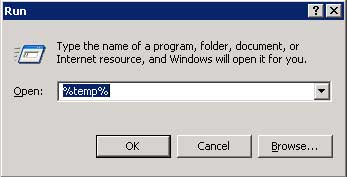
Whatever the installation screen displays, DO NOT CLOSE THE WINDOW, while its open all the files you need are made available. Next navigate to your temp folder. TIP: Go to Start Menu à Run, and type %temp%. This will bring up your temp files.
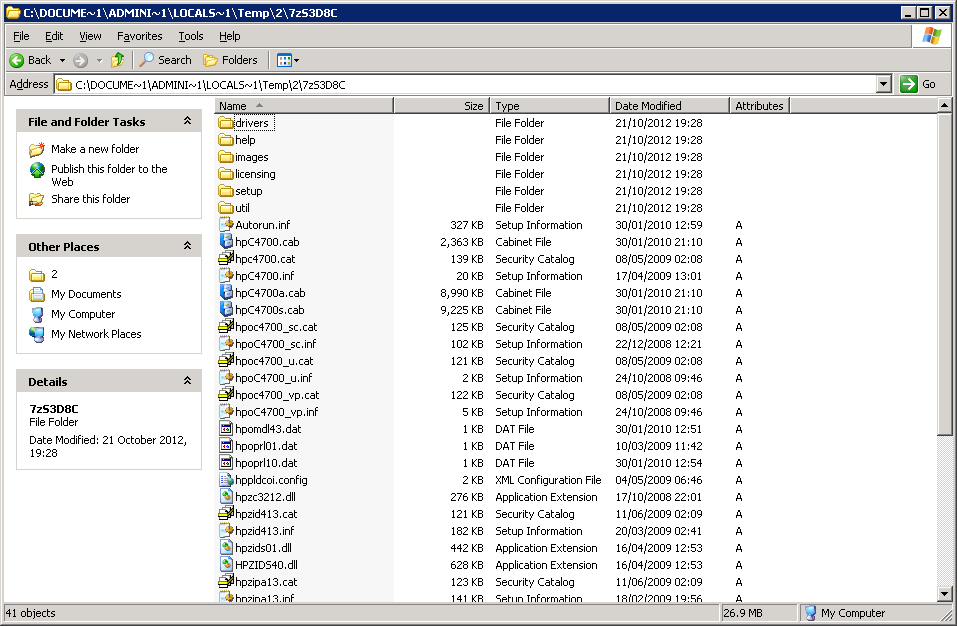
In the temp folder, look for a folder containing the setup files that were extracted as part of the installation, it will usually have .inf files that contain the printer model as part of the filename, below is an example of the drivers to install a HP C4700:
Look for references in the file names that match your printer’s
Step 3: At this point its best to copy (not move) the contents of the folder to a more convenient location. When a copy is made, you can close the installation utility as you have all the files in a new location.
Now navigate to Start > Settings > Printers and Faxes, and then start the Add new printer wizard.
After the intro splash, choose “Local printer attached to this computer” and un-check the box for “Automatically detect and install my Plug and Play printer”
Note: Step 4 is for installing a printer over a network, if you are connecting via USB, skip to step 5.
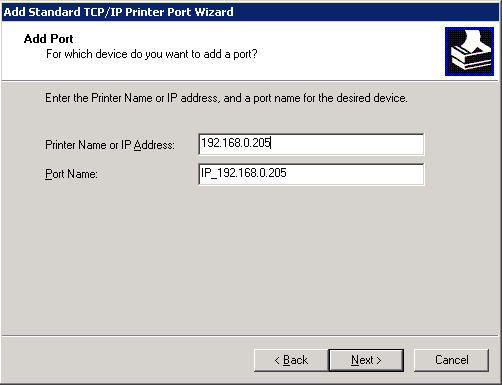
Step 4: Click next, on the next screen you will want to select “Create a new port” and choose “Standard TCP/IP port” from the drop-down menu, as below:
This brings up a new wizard, after the intro splash onto the add port screen, type the IP address of the printer:
NOTE: To save reconfiguration in the future, remember to set the printer to have a static IP address as you are not installing the program that find the printer on a dynamic IP address.
The next screen, leave the settings as a “Standard device type” and “Generic network card”. Clicking next brings you to printer software screen.
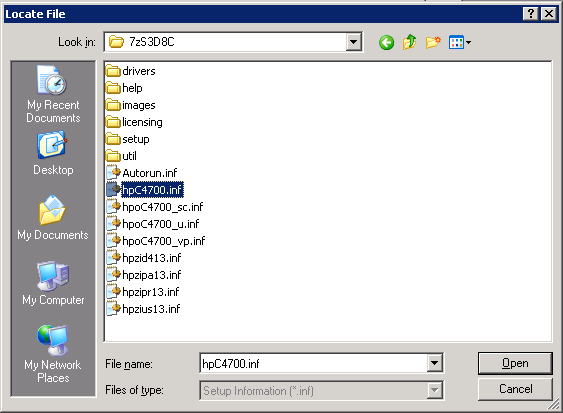
Step 5: Click the “Have Disk” button and navigate to the copy of the installation files.
Choose the most generic file name.
Only .inf files show, and you want to choose the most generic file name that is similar to your device, in this case above hpC4700.inf seems the most obvious.
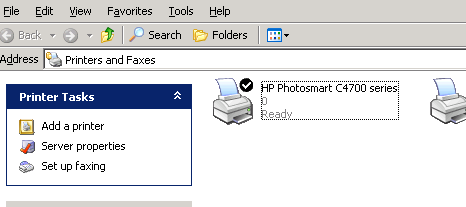
If the right file has been chosen, you see your printer display as below.
If you get a warning message about a digital signature, choose “Continue Anyways”, but make sure you downloaded the drivers from a reputable site, such as the official HP website.
The installation wizards copies the files, then choose to print a test page to make sure all is well, and your HP printer appears in your printers folder.