Sure, its not the most original of topics, but it is one I’ve relied upon from time to time. For years, this guide from Digital Ocean was my go to choice.
It wasn’t until my most recent visit for an upcoming project that things looked, well, a little different. It was mostly the same, but subtle differences meant it was no longer compatible with how I’d been familiar with setting it up.
Therefore this quick post is to capture the old method of setting it up for posterity.
The below steps are to replicate all MySQL databases on another server.
Prepare MySQL .conf files
To allow MySQL to replicate, the servers must be arranged in a hirarchy and logging enabled so each system can keep track and update any changes made.
The .conf files can be found in the following locations:
/etc/my.cnf.d/server.cnfOr on newer distros:
/etc/mysql/mariadb.conf.d/50-server.cnfSource/Master Server
On the source server (server you want to copy from), add the following lines below and within the [mysqld] section:
bind-address            = {local ip address},{remote ip address}
server-id               = 1
log_bin                 = /var/log/mariadb/mysql-bin.log

binlog-format = mixed
sync_binlog=1
Replica/Slave Server
On the replica server (server that databases are copied to), add the following lines below and within the [mysqld] section:
server-id               = 2
log_bin                 = /var/log/mysql/mysql-bin.log
relay-log               = /var/log/mysql/mysql-relay-bin.log
binlog-format           = mixed
read-only               = 1
On both servers, MySQL requires a restart to pick up the config changes:
systemctl restart mariadbCreate a replication user
A replication needs to be authenticated, rather than using the root user its preferred to create a user that is only able to perform the replication.
On the source server, login to MySQL:
mysql -u root -pCreate the user, and give it replication duties with the following commands:
CREATE USER '{replica_user}'@'{replica_ip}' IDENTIFIED BY '{password}';
GRANT REPLICATION SLAVE ON *.* TO '{replica_user}'@'{replica_ip}';
FLUSH PRIVILEGES;
Copy current databases
Before the replication can begin, we’ll need a copy of the existing data captured within a known point of time. This allows the replica to know where to pick up from where the imported databases left off.
Source Server
If not already, log into mysql :
mysql -u root -pLock the databases from being able to be written to:
FLUSH TABLES WITH READ LOCK;Display the current state of the logfiles while the databases are frozen in time:
SHOW MASTER STATUS;This will produce something similar to this:
MariaDB [(none)]> SHOW MASTER STATUS;
+------------------+----------+--------------+------------------+
| File             | Position | Binlog_Do_DB | Binlog_Ignore_DB |
+------------------+----------+--------------+------------------+
| mysql-bin.000016 |      342 |              |                  |
+------------------+----------+--------------+------------------+
1 row in set (0.000 sec)
Make a note of the File and Position values, we’ll need this as a reference point for the replica. I’d recommend saving it as a file for future reference.
Now, open up new SSH session to the source server. Its important that the current MySQL session is kept open and in its locked state.
Take a mysqldump of the entire database:
mysqldump -u root -p --all-databases > mysql_replication.sqlWhen this completes, return to the original session to return the databases to normal:
UNLOCK TABLES;Transfer SQL file to Replica
Move the generated mysqldump file to the replica server, I usually transfer the master status txt file too for future reference:
scp mysql_replication.sql mysql_master.txt root@{replica_ip}:/root/Setup Replication
Import the newly transferred file to the replica’s MySQL:
mysql -u root -p < mysql_replication.sqlThen log in to MySQL:
mysql -u root -pTime to setup the replication, using the replica user setup previously, and the logfile positions captured during the mysqldump. The SHOW MASTER STATUS; output from above is referenced in this command example:
CHANGE MASTER TO MASTER_HOST='{source_ip}', MASTER_USER='{replica_user}', MASTER_PASSWORD='{password}', MASTER_LOG_FILE='mysql-bin.000016', MASTER_LOG_POS=342;Reference points now in place, start the replication process:
START SLAVE;You can check it is running with:
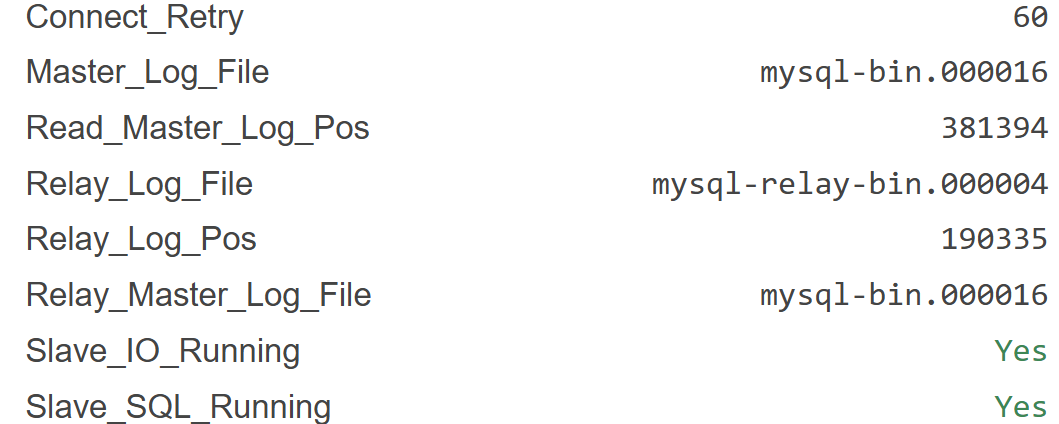
SHOW SLAVE STATUS\G;In the output you’re looking for Slave_IO_Running and Slave_SQL_Running to both be Yes:

With both reporting Yes, the replication is running. All changes made to the source server is automatically pushed to the replica.
Notes
Ports
The two databases communicate over its MySQL port, default is 3306. Ensure that both servers are able to communicate on this port.
Authentication
Immediately after setting up replication, you’ll be able to log in to the replica server as normal. However, if the service/server was to be restarted you may not be able to login as normal.
As this guide replicates everything on the source MySQL, it will also replicate the users and permissions.
Following a replication start, the “old” credentials are still usable But following a service restart, the credentials of the source are the new normal on the replica, and should be used for any future login.
This will also apply to any instances of phpMyAdmin.